 "W3AF is a Web Application Attack and Audit Framework. The project goal is to create a framework to find and exploit web application vulnerabilities that is easy to use and extend. This project is currently hosted at SourceForge." read more...
Thursday, May 21, 2020
W3AF
"W3AF is a Web Application Attack and Audit Framework. The project goal is to create a framework to find and exploit web application vulnerabilities that is easy to use and extend. This project is currently hosted at SourceForge." read more...CEH Practical: Information-Gathering Methodology


Footprinting
Footprinting is defined as the process of establishing a scenario or creating a map of an organization's network and systems. Information gathering is also known as footprinting an organization. Footprinting is an important part of reconnaissance process which is typically used for collecting possible information about a targeted computer system or network. Active and Passive both could be Footprinting. The example of passive footprinting is assessment of a company's website, whereas attempting to gain access to sensitive information through social engineering is an example of active information gathering. Basically footprinting is the beginning step of hacker to get hacked someone because having information about targeted computer system is the main aspect of hacking. If you have an information about individual you wanna hack so you can easily hacked that individual. The basic purpose of information gathering is at least decide what type of attacks will be more suitable for the target. Here are some of the pieces of information to be gathered about a targetduring footprinting:
- Domain name
- Network blocks
- Network services and applications
- System architecture
- Intrusion detection system
- Authentication mechanisms
- Specific IP addresses
- Access control mechanisms
- Phone numbers
- Contact addresses
Footprinting Tools
Footprinting can be done using hacking tools, either applications or websites, which allow the hacker to locate information passively. By using these footprinting tools, a hacker can gain some basic information on, or "footprint," the target. By first footprinting the target, a hacker can eliminate tools that will not work against the target systems or network. For example, if a graphics design firm uses all Macintosh computers, then all hacking software that targets Windows systems can be eliminated. Footprinting not only speeds up the hacking process by eliminating certain tool sets but also minimizes the chance of detection as fewer hacking attempts can be made by using the right tool for the job. Some of the common tools used for footprinting and information gathering are as follows:- Domain name lookup
- Whois
- NSlookup
- Sam Spade
Footprinting a Target
Footprinting is part of the preparatory pre-attack phase and involves accumulating data regarding a target's environment and architecture, usually for the purpose of finding ways to intrude into that environment. Footprinting can reveal system vulnerabilities and identify the ease with which they can be exploited. This is the easiest way for hackers to gather information about computer systems and the companies they belong to. The purpose of this preparatory phase is to learn as much as you can about a system, its remote access capabilities, its ports and services, and any specific aspects of its security.DNS Enumeration
DNS enumeration is the process of locating all the DNS servers and their corresponding records for an organization. A company may have both internal and external DNS servers that can yield information such as usernames, computer names, and IP addresses of potential target systems.NSlookup and DNSstuff
One powerful tool you should be familiar with is NSlookup (see Figure 2.2). This tool queries DNS servers for record information. It's included in Unix, Linux, and Windows operating systems. Hacking tools such as Sam Spade also include NSlookup tools. Building on the information gathered from Whois, you can use NSlookup to find additional IP addresses for servers and other hosts. Using the authoritative name server information from Whois ( AUTH1.NS.NYI.NET ), you can discover the IP address of the mail server.Syntax
nslookup www.sitename.com
nslookup www.usociety4.com
 |
| Performing DNS Lookup |
Understanding Whois and ARIN Lookups
Whois evolved from the Unix operating system, but it can now be found in many operating systems as well as in hacking toolkits and on the Internet. This tool identifies who has registered domain names used for email or websites. A uniform resource locator (URL), such as www.Microsoft.com , contains the domain name ( Microsoft.com ) and a hostname or alias ( www ).The Internet Corporation for Assigned Names and Numbers (ICANN) requires registration of domain names to ensure that only a single company uses a specific domain name. The Whois tool queries the registration database to retrieve contact information about the individual or organization that holds a domain registration.
Using Whois
- Go to the DNSStuff.com website and scroll down to the free tools at the bottom of the page.
- Enter your target company URL in the WHOIS Lookup field and click the WHOIS button.
- Examine the results and determine the following:
- Registered address
- Technical and DNS contacts
- Contact email
- Contact phone number
- Expiration date
- Visit the company website and see if the contact information from WHOIS matches up to any contact names, addresses, and email addresses listed on the website.
- If so, use Google to search on the employee names or email addresses. You can learn the email naming convention used by the organization, and whether there is any information that should not be publicly available.
Syntax
whois sitename.com
whois usociety4.com

Vsftpd Backdoor - Ekoparty Prectf - Amn3S1A Team
It's a 32bits elf binary of some version of vsftpd, where it have been added a backdoor, they don't specify is an authentication backdoor, a special command or other stuff.
I started looking for something weird on the authentication routines, but I didn't found anything significant in a brief period of time, so I decided to do a bindiff, that was the key for locating the backdoor quickly. I do a quick diff of the strings with the command "strings bin | sort -u" and "vimdiff" and noticed that the backdoored binary has the symbol "execl" which is weird because is a call for executing elfs, don't needed for a ftp service, and weird that the compiled binary doesn't has that symbol.

Looking the xrefs of "execl" on IDA I found that code that is a clear backdoor, it create a socket, bind a port and duplicate the stdin, stdout and stderr to the socket and use the execl:

There are one xrefs to this function, the function that decides when trigger that is that kind of systems equations decision:
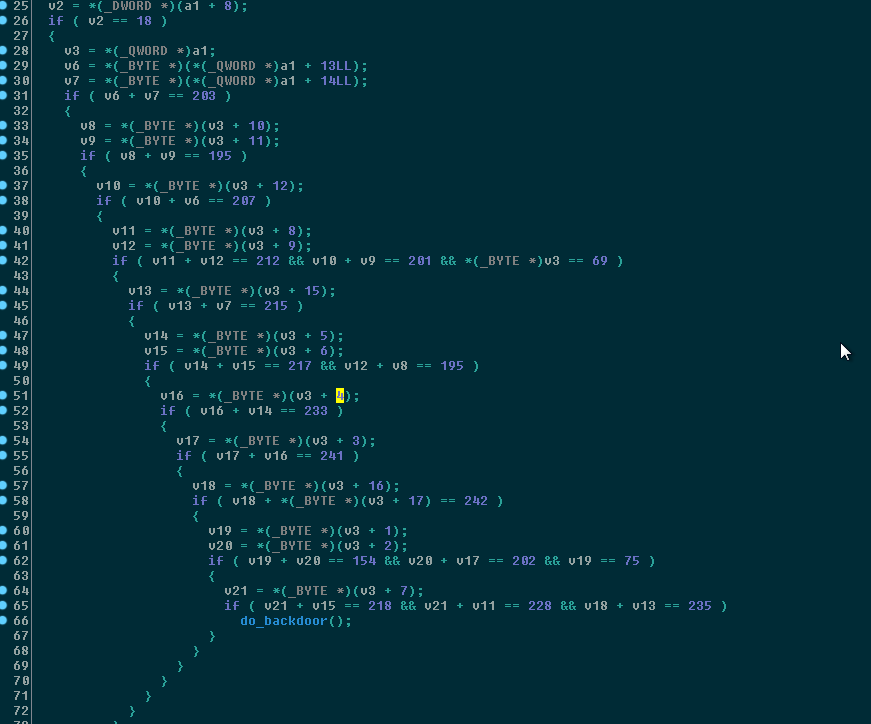
The backdoor was not on the authentication, it was a special command to trigger the backdoor, which is obfuscated on that systems equation, it was no needed to use a z3 equation solver because is a simple one and I did it by hand.
The equation:
cmd[0] = 69
cmd[1] = 78
cmd[1] + cmd[2] = 154
cmd[2] + cmd[3] = 202
cmd[3] + cmd[4] = 241
cmd[4] + cmd[5] = 233
cmd[5] + cmd[6] = 217
cmd[6] + cmd[7] = 218
cmd[7] + cmd[8] = 228
cmd[8] + cmd[9] = 212
cmd[9] + cmd[10] = 195
cmd[10] + cmd[11] = 195
cmd[11] + cmd[12] = 201
cmd[12] + cmd[13] = 207
cmd[13] + cmd[14] = 203
cmd[14] + cmd[15] = 215
cmd[15] + cmd[16] = 235
cmd[16] + cmd[17] = 242
The solution:
cmd[0] = 69
cmd[1] = 75
cmd[2] = 79
cmd[3] = 123
cmd[4] = 118
cmd[5] = 115
cmd[6] = 102
cmd[7] = 116
cmd[8] = 112
cmd[9] = 100
cmd[10] = 95
cmd[11] = 100
cmd[12] = 101
cmd[13] = 106
cmd[14] = 97
cmd[15] = 118
cmd[16] = 117
cmd[17] = 125
The flag:
EKO{vsftpd_dejavu}
The binary:
https://ctf.ekoparty.org/static/pre-ekoparty/backdoor
The binary:
https://ctf.ekoparty.org/static/pre-ekoparty/backdoor
Top Linux Commands Related To Hardware With Descriptive Definitions

Commands in Linux are just the keys to explore and close the Linux. As you can do things manually by simple clicking over the programs just like windows to open an applications. But if you don't have any idea about commands of Linux and definitely you also don't know about the Linux terminal. You cannot explore Linux deeply. Because terminal is the brain of the Linux and you can do everything by using Linux terminal in any Linux distribution. So, if you wanna work over the Linux distro then you should know about the commands as well. In this blog you will exactly get the content about Linux hardware commands which are related to CPU and memory processes.
dmesg
The dmesg command is used in Linux distribution for the sake of detecting hardware and boot messages in the Linux system.cat /proc/cpuinfo
The cat command is basically used to read something over the terminal like cat index.py will display all the content which exist in index.py over the terminal. So cat /proc/cpuinfo will display the model of the CPU over the terminal.cat /proc/meminfo
This command is similar to the above command but the only difference is that this command shows the information of hardware memory over the terminal. Because it will open the memory info file over the terminal.cat /proc/interrupts
This command is also similar to the above command but there is the difference of one thing that this command will display lists the number of interrupts per CPU per input output device.lshw
This command is used in Linux operating system to displays information on hardware configuration of the system in Linux.lsblk
The "lsblk" command is used in Linux operating system to displays block device related information in the Linux operating system.dmidecode
The "dmidecode" command is used in Linux distributions to display the information about hardware from the BIOS.hdparm -i /dev/sda
The hdparm command basically used to display the information about the disks available in the system. If you wanna know the information about the "sda" disk so just type "hdparm -i /dev/sda" and if you wanna know the information about "sdb" so just type "hdparm -i /dev/sdb".hdparm -tT
The "hdparm" command is used for displaying the information about disks as we discussed in above command. If you wanna do a read speed test on the disk sda or sdb just type the command "hdparm -tT /dev/sda".badblocks -s /dev/sda
This command is used in linux to display test operations for unreadable blocks on disk sda. If the command is like "badblocks -s /dev/sdb" it will display test operations for unreadable blocks on disk sdb.Related word
Wednesday, May 20, 2020
How To Hack Facebook Messenger Conversation
FACEBOOK Messenger has become an exceptionally popular app across the globe in general. This handy app comes with very interactive and user-friendly features to impress users of all ages.
With that being said, there are a lot of people who are interested in knowing how to hack Facebook Messenger in Singapore, Hong Kong and other places. The requirement to hack Facebook Messenger arises due to various reasons. In this article, we are going to explain how to hack Facebook Messenger with ease.
As you may know, Facebook Messenger offers a large range of features. Compared to the initial release of this app, the latest version shows remarkable improvement. Now, it has a large range of features including group chats, video calls, GIFs, etc. A lot of corporate organizations use Facebook messenger as a mode of communication for their marketing purposes. Now, this messenger app is compatible with chatbots that can handle inquiries.
Why Hack Facebook Messenger in Singapore?
You may be interested in hacking Facebook Messenger in Singapore (or anywhere else) for various reasons. If you suspect that your partner is having an affair, you may want to hack Facebook Messenger. Or, if you need to know what your kids are doing with the messenger, you will need to hack it to have real time access.
You know that both of these situations are pretty justifiable and you intend no unethical act. You shouldn't hack Facebook Messenger of someone doesn't relate to you by any means, such a practice can violate their privacy. Having that in mind, you can read the rest of this article and learn how to hack Facebook Messenger.
How to Hack Someone's Facebook Messenger in Singapore
IncFidelibus is a monitoring application developed by a team of dedicated and experienced professionals. It is a market leader and has a customer base in over 191+ countries. It is very easy to install the app, and it provides monitoring and hacking of Facebook for both iOS and Android mobile devices. You can easily hack into someone's Facebook messenger and read all of their chats and conversations.
Not just reading the chats, you can also see the photo profile of the person they are chatting to, their chat history, their archived conversations, the media shared between them and much more. The best part is that you can do this remotely, without your target having even a hint of it. Can it get any easier than this?

No Rooting or Jailbreaking Required
IncFidelibus allows hacking your target's phone without rooting or jailbreaking it. It ensures the safety of their phone remains intact. You don't need to install any unique rooting tool or attach any rooting device.
Total Web-Based Monitoring
You don't need to use any unique gadget or app to track activity with IncFidelibus. It allows total web-based monitoring. All that you need is a web browser to view the target device's data and online activities.
Spying With IncFidelibus in Singapore
Over ten years of security expertise, with over 570,000 users in about 155+ countries, customer support that can be reached through their website, and 96% customer satisfaction. Need more reasons to trust IncFidelibus?
Stealth Mode
IncFidelibus runs in pure Stealth mode. You can hack and monitor your target's device remotely and without them knowing about it. IncFidelibus runs in the background of your target's device. It uses very less battery power and doesn't slow down your phone.
Hacking Facebook Messenger in Singapore using IncFidelibus
Hacking Facebook Messenger has never been this easy. IncFidelibus is equipped with a lot of advance technology for hacking and monitoring Facebook. Hacking someone's Facebook Messenger is just a few clicks away!
Track FB Messages in Singapore
With IncFidelibus, you can view your target's private Facebook messages and group chats within a click. This feature also allows you to access the Facebook profile of the people your target has been interacting with. You can also get the media files shared between the two.
Android Keylogger
IncFidelibus is equipped with a powerful keylogger. Using this feature, you can record and then read every key pressed by your target on their device.
This feature can help get the login credentials of your target. You can easily log into someone's Facebook and have access to their Facebook account in a jiffy.

What Else Can IncFidelibus Do For You?
IncFidelibus control panel is equipped with a lot of other monitoring and hacking tools and services, including;
Other Social Media Hacking
Not just FB messenger, but you can also hack someone's Instagram, Viber, Snapchat, WhatsApp hack, SMS conversations, call logs, Web search history, etc.
SIM card tracking
You can also track someone SIM card if someone has lost their device, changed their SIM card. You can get the details of the new number also.
Easy Spying Possible with IncFidelibus
Monitoring someone's phone is not an easy task. IncFidelibus has spent thousands of hours, had sleepless nights, did tons of research, and have given a lot of time and dedication to make it possible.
@HACKER NT
Related word
How Do I Get Started With Bug Bounty ?
How do I get started with bug bounty hunting? How do I improve my skills?
These are some simple steps that every bug bounty hunter can use to get started and improve their skills:
Learn to make it; then break it!
A major chunk of the hacker's mindset consists of wanting to learn more. In order to really exploit issues and discover further potential vulnerabilities, hackers are encouraged to learn to build what they are targeting. By doing this, there is a greater likelihood that hacker will understand the component being targeted and where most issues appear. For example, when people ask me how to take over a sub-domain, I make sure they understand the Domain Name System (DNS) first and let them set up their own website to play around attempting to "claim" that domain.
Read books. Lots of books.
One way to get better is by reading fellow hunters' and hackers' write-ups. Follow /r/netsec and Twitter for fantastic write-ups ranging from a variety of security-related topics that will not only motivate you but help you improve. For a list of good books to read, please refer to "What books should I read?".
Join discussions and ask questions.
As you may be aware, the information security community is full of interesting discussions ranging from breaches to surveillance, and further. The bug bounty community consists of hunters, security analysts, and platform staff helping one and another get better at what they do. There are two very popular bug bounty forums: Bug Bounty Forum and Bug Bounty World.
Participate in open source projects; learn to code.
Go to https://github.com/explore or https://gitlab.com/explore/projects and pick a project to contribute to. By doing so you will improve your general coding and communication skills. On top of that, read https://learnpythonthehardway.org/ and https://linuxjourney.com/.
Help others. If you can teach it, you have mastered it.
Once you discover something new and believe others would benefit from learning about your discovery, publish a write-up about it. Not only will you help others, you will learn to really master the topic because you can actually explain it properly.
Smile when you get feedback and use it to your advantage.
The bug bounty community is full of people wanting to help others so do not be surprised if someone gives you some constructive feedback about your work. Learn from your mistakes and in doing so use it to your advantage. I have a little physical notebook where I keep track of the little things that I learnt during the day and the feedback that people gave me.
Learn to approach a target.
The first step when approaching a target is always going to be reconnaissance — preliminary gathering of information about the target. If the target is a web application, start by browsing around like a normal user and get to know the website's purpose. Then you can start enumerating endpoints such as sub-domains, ports and web paths.
A woodsman was once asked, "What would you do if you had just five minutes to chop down a tree?" He answered, "I would spend the first two and a half minutes sharpening my axe."
As you progress, you will start to notice patterns and find yourself refining your hunting methodology. You will probably also start automating a lot of the repetitive tasks.
Read more
Tuesday, May 19, 2020
Hacktivity 2018 Badge - Quick Start Guide For Beginners
You either landed on this blog post because
- you are a huge fan of Hacktivity
- you bought this badge around a year ago
- you are just interested in hacker conference badge hacking.
or maybe all of the above. Whatever the reasons, this guide should be helpful for those who never had any real-life experience with these little gadgets.
But first things first, here is a list what you need for hacking the badge:
- a computer with USB port and macOS, Linux or Windows. You can use other OS as well, but this guide covers these
- USB mini cable to connect the badge to the computer
- the Hacktivity badge from 2018
By default, this is how your badge looks like.

Let's get started
Luckily, you don't need any soldering skills for the first steps. Just connect the USB mini port to the bottom left connector on the badge, connect the other part of the USB cable to your computer, and within some seconds you will be able to see that the lights on your badge are blinking. So far so good.
Now, depending on which OS you use, you should choose your destiny here.
Linux
The best source of information about a new device being connected is
# dmesg
The tail of the output should look like
[267300.206966] usb 2-2.2: new full-speed USB device number 14 using uhci_hcd
[267300.326484] usb 2-2.2: New USB device found, idVendor=0403, idProduct=6001
[267300.326486] usb 2-2.2: New USB device strings: Mfr=1, Product=2, SerialNumber=3
[267300.326487] usb 2-2.2: Product: FT232R USB UART
[267300.326488] usb 2-2.2: Manufacturer: FTDI
[267300.326489] usb 2-2.2: SerialNumber: AC01U4XN
[267300.558684] usbcore: registered new interface driver usbserial_generic
[267300.558692] usbserial: USB Serial support registered for generic
[267300.639673] usbcore: registered new interface driver ftdi_sio
[267300.639684] usbserial: USB Serial support registered for FTDI USB Serial Device
[267300.639713] ftdi_sio 2-2.2:1.0: FTDI USB Serial Device converter detected
[267300.639741] usb 2-2.2: Detected FT232RL
[267300.643235] usb 2-2.2: FTDI USB Serial Device converter now attached to ttyUSB0
Dmesg is pretty kind to us, as it even notifies us that the device is now attached to ttyUSB0.
From now on, connecting to the device is exactly the same as it is in the macOS section, so please find the "Linux users, read it from here" section below.
macOS
There are multiple commands you can type into Terminal to get an idea about what you are looking at. One command is:
# ioreg -p IOUSB -w0 -l
With this command, you should get output similar to this:
+-o FT232R USB UART@14100000  <class AppleUSBDevice, id 0x100005465, registered, matched, active, busy 0 (712 ms), retain 20>
    |   {
    |     "sessionID" = 71217335583342
    |     "iManufacturer" = 1
    |     "bNumConfigurations" = 1
    |     "idProduct" = 24577
    |     "bcdDevice" = 1536
    |     "Bus Power Available" = 250
    |     "USB Address" = 2
    |     "bMaxPacketSize0" = 8
    |     "iProduct" = 2
    |     "iSerialNumber" = 3
    |     "bDeviceClass" = 0
    |     "Built-In" = No
    |     "locationID" = 336592896
    |     "bDeviceSubClass" = 0
    |     "bcdUSB" = 512
    |     "USB Product Name" = "FT232R USB UART"
    |     "PortNum" = 1
    |     "non-removable" = "no"
    |     "IOCFPlugInTypes" = {"9dc7b780-9ec0-11d4-a54f-000a27052861"="IOUSBFamily.kext/Contents/PlugIns/IOUSBLib.bundle"}
    |     "bDeviceProtocol" = 0
    |     "IOUserClientClass" = "IOUSBDeviceUserClientV2"
    |     "IOPowerManagement" = {"DevicePowerState"=0,"CurrentPowerState"=3,"CapabilityFlags"=65536,"MaxPowerState"=4,"DriverPowerState"=3}
    |     "kUSBCurrentConfiguration" = 1
    |     "Device Speed" = 1
    |     "USB Vendor Name" = "FTDI"
    |     "idVendor" = 1027
    |     "IOGeneralInterest" = "IOCommand is not serializable"
    |     "USB Serial Number" = "AC01U4XN"
    |     "IOClassNameOverride" = "IOUSBDevice"
    |   }
The most important information you get is the USB serial number - AC01U4XN in my case.
Another way to get this information is
Another way to get this information is
# system_profiler SPUSBDataTypewhich will give back something similar to:
FT232R USB UART:

          Product ID: 0x6001
          Vendor ID: 0x0403  (Future Technology Devices International Limited)
          Version: 6.00
          Serial Number: AC01U4XN
          Speed: Up to 12 Mb/sec
          Manufacturer: FTDI
          Location ID: 0x14100000 / 2
          Current Available (mA): 500
          Current Required (mA): 90
          Extra Operating Current (mA): 0
The serial number you got is the same.
What you are trying to achieve here is to connect to the device, but in order to connect to it, you have to know where the device in the /dev folder is mapped to. A quick and dirty solution is to list all devices under /dev when the device is disconnected, once when it is connected, and diff the outputs. For example, the following should do the job:
The result should be obvious, /dev/tty.usbserial-AC01U4XN is the new device in case macOS. In the case of Linux, it was /dev/ttyUSB0.
Regarding the async config parameters, the default is that 8 bits are used, there is no parity bit, and 1 stop bit is used. The short abbreviation for this is 8n1. In the next example, you will use the screen command. By default, it uses 8n1, but it is called cs8 to confuse the beginners.
If you type:
# screen /dev/tty.usbserial-AC01U4XN 9600
or
# screen /dev/ttyUSB0 9600
and wait for minutes and nothing happens, it is because the badge already tried to communicate via the USB port, but no-one was listening there. Disconnect the badge from the computer, connect again, and type the screen command above to connect. If you are quick enough you can see that the amber LED will stop blinking and your screen command is greeted with some interesting information. By quick enough I mean ˜90 seconds, as it takes the device 1.5 minutes to boot the OS and the CTF app.


You might check the end of the macOS section in case you can't see anything. Timing is everything.
What you are trying to achieve here is to connect to the device, but in order to connect to it, you have to know where the device in the /dev folder is mapped to. A quick and dirty solution is to list all devices under /dev when the device is disconnected, once when it is connected, and diff the outputs. For example, the following should do the job:
ls -lha /dev/tty* > plugged.txt
ls -lha /dev/tty* > np.txt
vimdiff plugged.txt np.txt
The result should be obvious, /dev/tty.usbserial-AC01U4XN is the new device in case macOS. In the case of Linux, it was /dev/ttyUSB0.
Linux users, read it from here. macOS users, please continue reading
Now you can use either the built-in screen command or minicom to get data out from the badge. Usually, you need three information in order to communicate with a badge. Path on /dev (you already got that), speed in baud, and the async config parameters. Either you can guess the speed or you can Google that for the specific device. Standard baud rates include 110, 300, 600, 1200, 2400, 4800, 9600, 14400, 19200, 38400, 57600, 115200, 128000 and 256000 bits per second. I usually found 1200, 9600 and 115200 a common choice, but that is just me.Regarding the async config parameters, the default is that 8 bits are used, there is no parity bit, and 1 stop bit is used. The short abbreviation for this is 8n1. In the next example, you will use the screen command. By default, it uses 8n1, but it is called cs8 to confuse the beginners.
If you type:
# screen /dev/tty.usbserial-AC01U4XN 9600
or
# screen /dev/ttyUSB0 9600
and wait for minutes and nothing happens, it is because the badge already tried to communicate via the USB port, but no-one was listening there. Disconnect the badge from the computer, connect again, and type the screen command above to connect. If you are quick enough you can see that the amber LED will stop blinking and your screen command is greeted with some interesting information. By quick enough I mean ˜90 seconds, as it takes the device 1.5 minutes to boot the OS and the CTF app.
Windows
When you connect the device to Windows, you will be greeted with a pop-up.

Just click on the popup and you will see the COM port number the device is connected to:

In this case, it is connected to COM3. So let's fire up our favorite putty.exe, select Serial, choose COM3, add speed 9600, and you are ready to go!

You might check the end of the macOS section in case you can't see anything. Timing is everything.
The CTF
Welcome to the Hacktivity 2018 badge challenge!

This challenge consists of several tasks with one or more levels of
difficulty. They are all connected in some way or another to HW RE
and there's no competition, the whole purpose is to learn things.

Note: we recommend turning on local echo in your terminal!
Also, feel free to ask for hints at the Hackcenter!

Choose your destiny below:

  1. Visual HW debugging
  2. Reverse engineering
  3. RF hacking
  4. Crypto protection

Enter the number of the challenge you're interested in and press [
Excellent, now you are ready to hack this! In case you are lost in controlling the screen command, go to https://linuxize.com/post/how-to-use-linux-screen/.
I will not spoil any fun in giving out the challenge solutions here. It is still your task to find solutions for these.
But here is a catch. You can get a root shell on the device. And it is pretty straightforward. Just carefully remove the Omega shield from the badge. Now you see two jumpers; by default, these are connected together as UART1. As seen below.

But what happens if you move these jumpers to UART0? Guess what, you can get a root shell! This is what I call privilege escalation on the HW level :) But first, let's connect the Omega shield back. Also, for added fun, this new interface speaks on 115200 baud, so you should change your screen parameters to 115200. Also, the new interface has a different ID under /dev, but I am sure you can figure this out from now on.

If you connect to the device during boot time, you can see a lot of exciting debug information about the device. And after it boots, you just get a root prompt. Woohoo!
But what can you do with this root access? Well, for starters, how about running
# strings hello | less
From now on, you are on your own to hack this badge. Happy hacking.
Big thanks to Attila Marosi-Bauer and Hackerspace Budapest for developing this badge and the contests.
PS: In case you want to use the radio functionality of the badge, see below how you should solder the parts to it. By default, you can process slow speed radio frequency signals on GPIO19. But for higher transfer speeds, you should wire the RF module DATA OUT pin with the RX1 free together.

Subscribe to:
Posts (Atom)
